Create an New Operator
Background
What is a Custom Op
OneFlow abstracts all kinds of data processing into op (operator). Op acts on the input tensor and writes the result of the operation to the output tensor. OneFlow provides relatively comprehensive ops and they can be found in ops directory.
When OneFlow's existing Python operators are not sufficient to build a neural network or when Python operators do not meet performance requirements. You can use C++ to develop custom op in OneFlow.
OneFlow provides a mechanism with which you can create custom op and register it in OneFlow then use custom op in Python.
The following diagram demonstrates the registration system for a custom op in OneFlow.
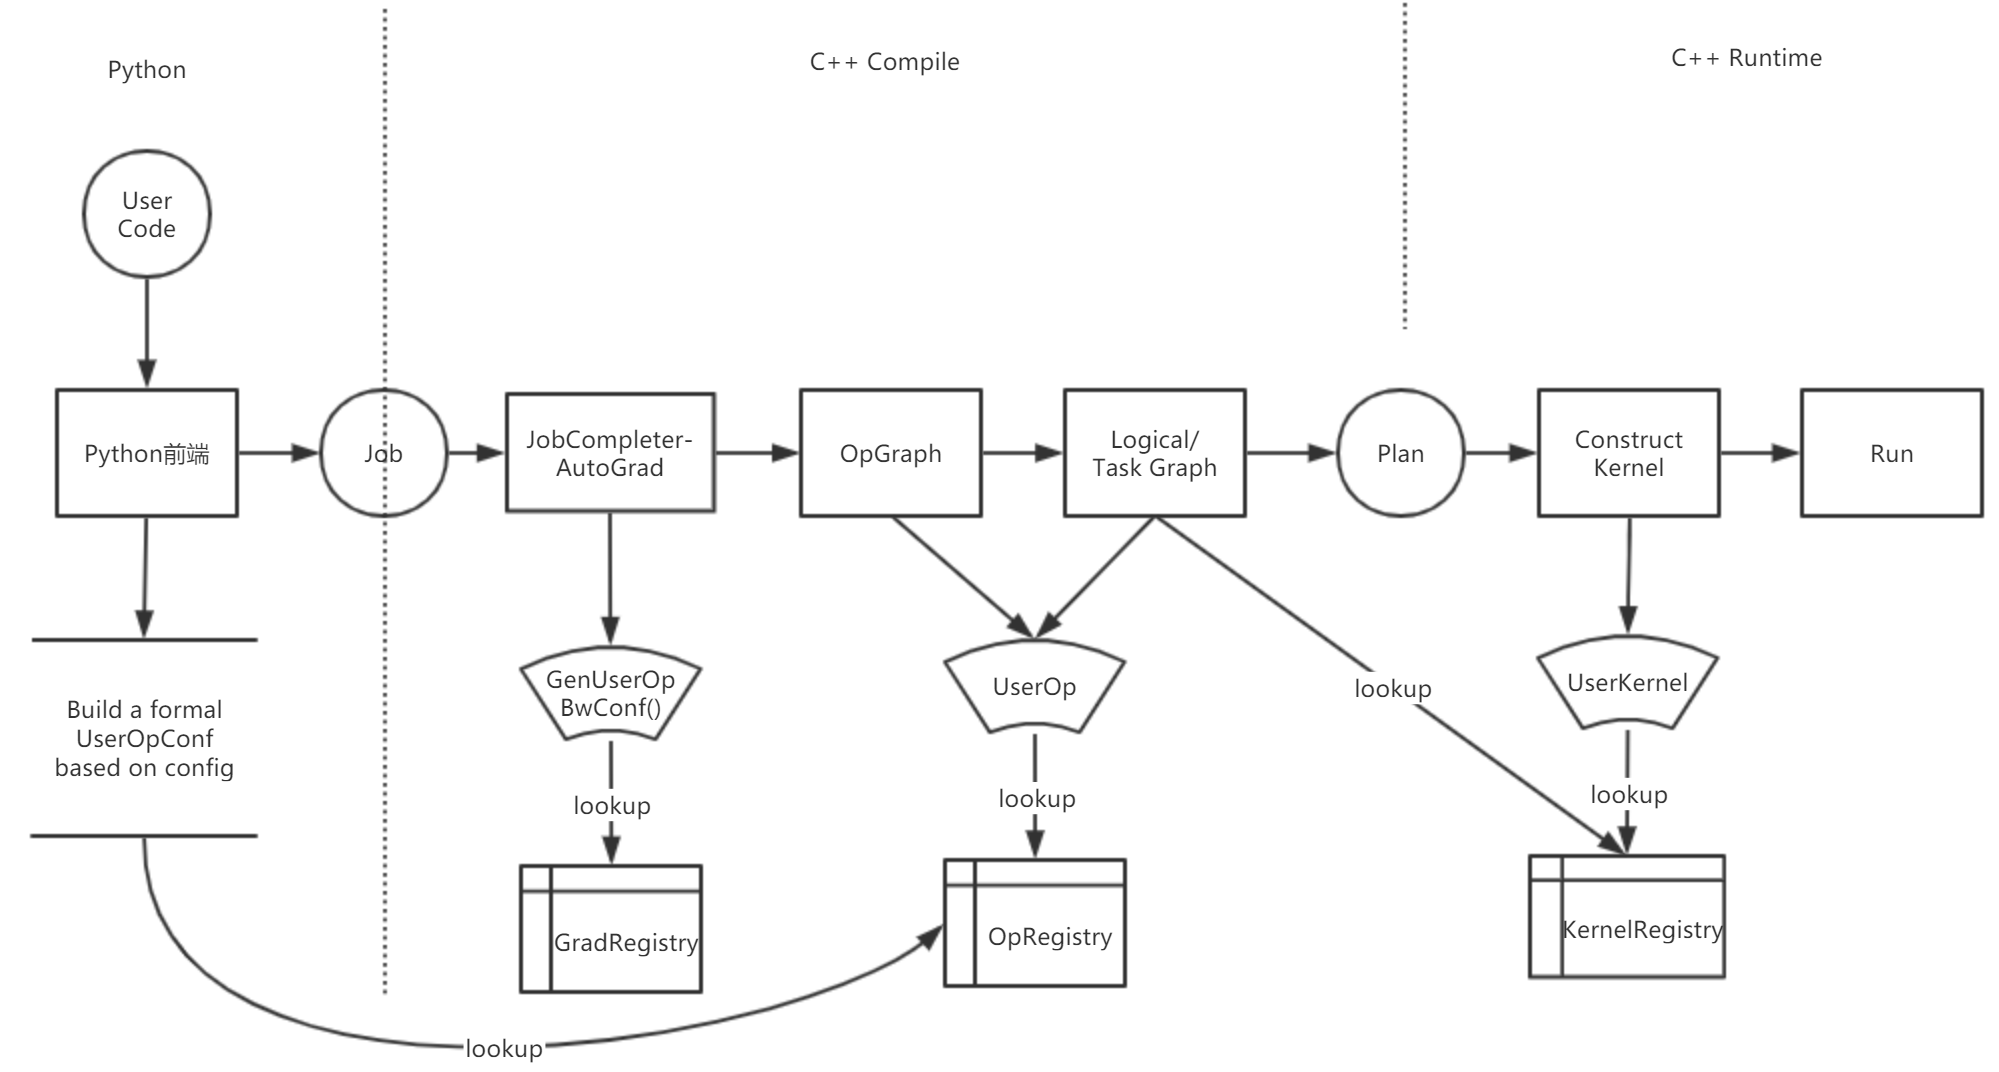
In the OneFlow framework, there are three types of registries associated with custom op.
-
OpGradRegistry:Manage gradient registration for automatic gradient calculation in backward graph. -
OpRegistry:Manage op registrations for generating forward digraph and buildingTask Graph. -
OpKernelRegistry:Manage kernel registrations for performing user logic at runtime.
We actually write custom op in C++ and generate a dynamic link library (so file). By loading the corresponding so file in Python that you can use the custom op.
The data structure of user op can be viewed at user_op_conf.proto:
syntax = "proto2";
package oneflow;

import "oneflow/core/framework/user_op_attr.proto";

message UserOpConf {
  message ListString {
    repeated string s = 1;
  }
  required string op_type_name = 1;
  map<string, ListString> input = 2;
  map<string, ListString> output = 3;
  map<string, UserOpAttrVal> attr = 4;
}
The op_type_name is a string which representing the class of op and indicate the globally unique ID of the op class. OneFlow queries and confirms the op class by op_type_name which will appear several times in the rest of this document.
Basic Concepts
-
Op_type_name:As mentioned above, op_type_name is the unique ID of op class. OneFlow queries and confirms op class by op_type_name, and then instantiates the op. The relationship between op class and op is similar to the relationship between class and object.
-
Op:Logical operators contain information of input and output shapes for mapping and reasoning, but do not contain logic for processing the data.
-
Kernel:When a logical op running, the processing logic will affect by physical device and data type. The specific processing logic is done by the kernel. Generally op has a one-to-many relationship with the kernel and we need to register the kernel for all the physical devices and data types that op supports.
-
Registration:Registration can be used to establish a link between a custom op and the OneFlow framework. A series of macros named
REGISTER_XXXare provided in OneFlow to help with registration of op. -
Loading the dynamic library:The custom op and its kernel are linked as dynamic library so files that need to be loaded before using them in Python and OneFlow provides
oneflow.config.load_libraryto load the so files of custom op. -
Python wrapper:Calling a custom op implemented at the C++ layer in Python requires writing a wrapper at the Python layer and OneFlow provides
oneflow.user_op_builderto do this task.
Process of Writing a Custom Op
-
Implementation and registration of op:The implementation of op is primarily used for forward digraph composition which includes specifying the name of op, inputs, outputs, configuration attributes and the necessary functions to infer the shape and data type of the tensor.
-
Implementation and registration of the kernel for an op: The kernel is responsible for the specific computational process during running and an op may correspond to multiple kernels
-
(optional) Implementation and registration of op's corresponding grad: If the custom op needs to support backward spreading. Then we need to implement and register a backward function for it.
-
Compile and link to get so file
-
Load the so file in Python and use
oneflow.user_op_builderto wrap a custom op written in C++. -
Testing.
Example
We will implement a custom op called "myrelu" which supports both CPU and GPU operations. For the complete code please refer to: code/extended_topics/create_user_op.
Implementation and Registration of Op
We defined op and completed the registration in myrelu_op.cpp:
#include "oneflow/core/framework/framework.h"

namespace oneflow {

namespace {

REGISTER_USER_OP("myrelu")
  .Input("in")
  .Output("out")
  .SetTensorDescInferFn(
      [](user_op::InferContext *ctx) -> Maybe<void> {
        *ctx->Shape4ArgNameAndIndex("out", 0) =
            *ctx->Shape4ArgNameAndIndex("in", 0);
        *ctx->Dtype4ArgNameAndIndex("out", 0) =
            *ctx->Dtype4ArgNameAndIndex("in", 0);
        return Maybe<void>::Ok();
      });
} // namespace

} // namespace oneflow
Analysis of the above codes:
-
oneflow/core/framework/framework.hcontains all the controllers we need to create an op. -
Almost all the APIs related to user op are in the namespace
oneflow::user_op, so we use the namespaceoneflowto simplify the type name. -
The macro
REGISTER_USER_OPis used to register the op and acceptsmyreluasop_type_name. -
After registering with
REGISTER_USER_OP, it actually returns anOpRegistryclass (path:oneflow\coreframework\user_op_registry.h) which can be called to complete the setting of a custom op: -
Input("in")means that it has an input named "in". Output("out")means that it has an output named "out".SetTensorDescInferFnis used to set the shape and data type of the inferring function which describe the relationship between the input of this operator and shape and type of the output of this operator. In the above code, the shape and data type of the output is consistent with input.
Implementation and Registration of CPU Kernel
We implemented the CPU kernel in myrelu_cpu_kernel.cpp and registered it:
#include "oneflow/core/framework/framework.h"

namespace oneflow {

namespace {

template <typename T>
void MyRelu(DeviceCtx *ctx, const int64_t n, const T *x, T *y) {
  T zero = (T)(0);
  for (int64_t i = 0; i != n; ++i) {
    y[i] = std::max(x[i], zero);
  }
}

template <DeviceType device_type, typename T>
class ReluKernel final : public user_op::OpKernel {
public:
  ReluKernel() = default;
  ~ReluKernel() = default;

private:
  void Compute(user_op::KernelComputeContext *ctx) const override {
    const user_op::Tensor *in_tensor = ctx->Tensor4ArgNameAndIndex("in", 0);
    user_op::Tensor *out_tensor = ctx->Tensor4ArgNameAndIndex("out", 0);
    MyRelu<T>(ctx->device_ctx(),
           in_tensor->shape().elem_cnt(),
           in_tensor->dptr<T>(),
           out_tensor->mut_dptr<T>());
  }
  bool AlwaysComputeWhenAllOutputsEmpty() const override { return false; }
};

#define REGISTER_RELU_KERNEL(device, dtype)          \
  REGISTER_USER_KERNEL("myrelu")                     \
      .SetCreateFn<ReluKernel<device, dtype>>()      \
      .SetIsMatchedHob(                              \
          (user_op::HobDeviceTag() == device) &     \
          (user_op::HobDataType("out", 0)            \
            == GetDataType<dtype>::value));

REGISTER_RELU_KERNEL(DeviceType::kCPU, float)
REGISTER_RELU_KERNEL(DeviceType::kCPU, double)
} // namespace

} // namespace oneflow
To implement the kernel in OneFlow, you must define a class which inherits from oneflow::user_op::OpKernel and rewrite the virtual functions of it.
In the above code, we rewrite Compute and AlwaysComputeWhenAllOutputsEmpty and their respective meanings are:
-
Computemust be rewritten to implement the specific operating logic. -
AlwaysComputeWhenAllOutputsEmptymust be rewritten to returnfalsein most cases. For very few ops that need to maintain state internally, and therefore need to call the kernel for calculation even if the output is empty, it should returntrue.
After implementing the kernel class, you need to call REGISTER_USER_KERNEL to register it. The string parameter that REGISTER_USER_KERNEL("myrelu") accepts is op_type_name which is used to complete registration and querying. You also need to use op_type_name when wrapping op at the Python layer.
REGISTER_USER_KERNEL("myrelu") returns an OpKernelRegistry object. The methods that need to be called to set the registration information are mention in the code above.
-
SetCreateFn<T>(): The method of this template's parameterTis our implementation of the kernel class which OneFlow will use it to create the kernel object. -
SetIsMatchedHob:Because an op may have more than one kernels. You need to callSetIsMatchedHobto select a specific kernel for the calculation according to the physical device and data format. This method accepts an expression and when the expression istrue, OneFlow will call the kernel to complete the calculation.
Implementation and Registration of GPU Kernel
We implemented the GPU version of the kernel in myrelu_gpu_kernel.cu and registered it:
#include "oneflow/core/framework/framework.h"
#include <cub/cub.cuh>

namespace oneflow {
namespace {
template <typename T>
__global__ void ReluForwardGpu(const int n, const T *x, T *y) {
  CUDA_1D_KERNEL_LOOP(i, n) { y[i] = x[i] > 0 ? x[i] : 0; }
}

class ReluGpuFloatKernel final : public user_op::OpKernel {
public:
  ReluGpuFloatKernel() = default;
  ~ReluGpuFloatKernel() = default;

private:
  void Compute(user_op::KernelComputeContext *ctx) const override {
    const user_op::Tensor *in_tensor = ctx->Tensor4ArgNameAndIndex("in", 0);
    user_op::Tensor *out_tensor = ctx->Tensor4ArgNameAndIndex("out", 0);

    int32_t n = in_tensor->shape().elem_cnt();
    const float *in_ptr = in_tensor->dptr<float>();
    float *out_ptr = out_tensor->mut_dptr<float>();
    ReluForwardGpu<float>
        <<<32, 1024, 0, ctx->device_ctx()->cuda_stream()>>>(n, in_ptr, out_ptr);
  }

  bool AlwaysComputeWhenAllOutputsEmpty() const override { return false; }
};

#define REGISTER_RELU_KERNEL(device, dtype)          \
  REGISTER_USER_KERNEL("myrelu")                     \
      .SetCreateFn<ReluGpuFloatKernel>()             \
      .SetIsMatchedHob(                              \
          (user_op::HobDeviceTag() == device) &     \
          (user_op::HobDataType("out", 0)            \
            == GetDataType<dtype>::value));

REGISTER_RELU_KERNEL(DeviceType::kGPU, float)
REGISTER_RELU_KERNEL(DeviceType::kGPU, double)
} // namespace
} // namespace oneflow
The process of implementing and registering the GPU kernel is almost identical to the CPU kernel. The main differences are:
-
Because CUDA programming is used, the CUDA header files are included.
-
Computeuses GPU methods. -
SetIsMatchedHobset the matching device as GPU.
Besides that, because of the use of CUDA, we need to use the nvcc compiler (instead of g++) to compile the GPU kernel.
Compiling Option Description
The oneflow.sysconfig contains the get_compile_flags, get_include, get_lib, and get_link_flags which corresponding to:
- Compiling Options
- Dictionary of header file
- Dictionary of link library
- Linking options
For example:
>>> import oneflow
>>> oneflow.sysconfig.get_compile_flags()
['-I/home/yaochi/oneflow/build/python_scripts/oneflow/include', '-DHALF_ENABLE_CPP11_USER_LITERALS=0', '-DWITH_CUDA', '-D_GLIBCXX_USE_CXX11_ABI=0']
You can also get compile and link options directly by using command:
python -c "import oneflow; print(' '.join(oneflow.sysconfig.get_compile_flags()))"
python -c "import oneflow; print(' '.join(oneflow.sysconfig.get_link_flags()))"
For the GPU kernel, the cudart library also needs to be specified when linking.
Get Dynamic Library by Compilation and Linking
For this simple example, you can use the following Makefile to build:
CFLAGS = $(shell python -c "import oneflow; print(' '.join(oneflow.sysconfig.get_compile_flags()))")
LFLAGS = $(shell python -c "import oneflow; print(' '.join(oneflow.sysconfig.get_link_flags()))")
CUDAPATH = /usr/local/cuda-10.1/lib64

all: final_relu.so

myrelu_op.o: myrelu_op.cpp
    g++ -std=c++11 -c myrelu_op.cpp \
    -o myrelu_op.o                  \
    -fPIC                           \
    ${CFLAGS}                       \
    ${LFLAGS}                       \
    -O2

myrelu_cpu_kernel.o: myrelu_cpu_kernel.cpp
    g++ -std=c++11 -c myrelu_cpu_kernel.cpp \
    -o myrelu_cpu_kernel.o                  \
    $(CFLAGS) -fPIC

myrelu_gpu_kernel.o: myrelu_gpu_kernel.cu
    nvcc -std=c++11 -c myrelu_gpu_kernel.cu \
    -o myrelu_gpu_kernel.o                  \
    $(CFLAGS) -x cu -Xcompiler -fPIC

final_relu.so: myrelu_op.o myrelu_cpu_kernel.o myrelu_gpu_kernel.o
    g++ -std=c++11 myrelu_op.o \
    myrelu_cpu_kernel.o        \
    myrelu_gpu_kernel.o        \
    -shared -o final_relu.so   \
    $(CFLAGS)                  \
    -fPIC                      \
    -L$(CUDAPATH)              \
    -lcudart                   \
    $(LFLAGS)

clean:
    rm -rf *.so *.o
We use g++ to compile myrelu_op.cpp and myrelu_cpu_kernel.cpp, use nvcc to compile myrelu_gpu_kernel.cpp. Then get the target file (".o" file) and link the target file to final_ relu.so.
We are going to load final_relu.so in Python then use wrappers and custom op.
Using the Custom Op in Python
Using a custom op in Python needs the following steps:
-
Load the so file by
oneflow.config.load_library. -
Use
oneflow.user_op_builderto generating Python wrapper for custom op. -
Call the above result of Python wrapper.
The following code encapsulates myrelu at the Python layer and call it:
import oneflow as flow
import numpy as np
import oneflow.typing as tp

# load modules
flow.config.load_library("final_relu.so")

# default configuration
flow.config.gpu_device_num(1)

# python op wrapper function
def myrelu(input_blob):
    op = (
        flow.user_op_builder("op_myrelu")
        .Op("myrelu")
        .Input("in", [input_blob])
        .Output("out")
        .Build()
    )
    return op.InferAndTryRun().SoleOutputBlob()


# network code
@flow.global_function()
def MyJob(x: tp.Numpy.Placeholder((5,), dtype=flow.float32)) -> tp.Numpy:
    return myrelu(x)

if __name__ == "__main__":
    input = np.array([-2, -1, 0, 1, 2], dtype=np.float32)
    output = MyJob(input)
    print(input)
    print(output)
The expected results are:
[-2. -1.  0.  1.  2.]
[0. 0. 0. 1. 2.]
In the above code: flow.config.load_library("final_relu.so") is to load the so file.
We are focus on the process of building and running the python wrapper in myrelu.
flow.user_op_builder("op_myrelu") actually returns a UserOpConfBuilder object named op_myrelu.
    op = (
        flow.user_op_builder("op_myrelu")
        .Op("myrelu")
        .Input("in", [input_blob])
        .Output("out")
        .Build()
    )
This object contains Op, Input and and etc methods which are used to encapsulate custom op. Details explanation are as follows:
-
Op("myrelu"): The parameter must be theop_type_namefrom the previous C++ registration which OneFlow uses to find the registered op type and instantiate the op. -
Input("in", [input_blob]): Corresponds toInputwhen op is registered in C++ that the first parameter must be the same as the string set byInputwhen op is registered in C++. The second parameter is the blob of the input which is alist. Because an op allows multiple inputs. -
Output("out"): Corresponds toOutputwhen op registered in C++. -
Build:After the above settings are complete, callBuildto get the Python wrapper from the custom op.
The following code will get the blob of the custom op:
return op.InferAndTryRun().SoleOutputBlob()
InferAndTryRun completes the derivation and returns UserOp. If the returned blob has only one output. We cab use SoleOutputBlob to get the unique output. Otherwise use RemoteBlobList to get a list of multiple blobs.
So far, we have built the myrelu which is a relatively simple op. But if we need to build a more complex op, we should use some additional features in the registration process.
We'll introduce it from the aspects of op registration, kernel registration, gradient registration and Python layer wrapping.
Detailed Introduction of OpRegistry
Attr
Some ops require configuration properties in addition to inputs and outputs. For example, the reshape needs to be configured the shape and the conv needs to be configured the alignment method. We can use the Attr at registration to set attributes for op. For example:
OpRegistry& Attr<cpp_type>(const std::string& name);
We just need to specify the name and type of the attribute. For example:
REGISTER_USER_OP("reshape")
    .Input("in")
    .Output("out")
    .Attr<shape>("shape")
REGISTER_USER_OP("conv2d")
    .Input("in")
    .Input("weight")
    .Output("out")
    .Attr<std::vector<int32_t>>("padding_before")
In OneFlow, we currently support the following C++ data:
| UserOpAttrType | Corresponding C++ data types |
|---|---|
| kAtInt32 | int32_t |
| kAtInt64 | int64_t |
| kAtBool | bool |
| kAtFloat | float |
| kAtDouble | double |
| kAtShape | oneflow::Shape |
| kAtListInt32 | std::vector |
| kAtListInt64 | std::vector |
| kAtListFloat | std::vector< float > |
| kAtString | std::string |
We can pass an additional parameter and configure a default value for it which is the corresponding C++ datatype in the table. Such as:
.Attr<bool>("is_transpose", false)

.Attr<int32_t>("size", 10)

.Attr<std::vector<int32_t>>("vector_of_size", std::vector<int32_t>{10, 11, 12})
SetCheckAttrFn
For some Attributes, they require a more detailed delineation of the range which can be specified by SetCheckAttrFn when registering the Op.
Take Conv op as an example, it has a configuration option called data_format which is a string type but the data must be channels_first or channels_last.
.Attr<std::string>("data_format", std::string("NCHW"))
.SetCheckAttrFn(
  [](const user_op::UserOpDefWrapper& def,
    const user_op::UserOpConfWrapper& conf) -> Maybe<void> {
   std::string data_format = conf.attr<std::string>("data_format");
   if (data_format == "channels_first" || data_format == "channels_last") {
     return Maybe<void>::Ok();
   }
   return oneflow::Error::CheckFailed()
         << "data_format value: "
         << data_format
         << " for Conv op is illegal.";
})
Set a function to check that returns Maybe<void>::Ok() when the value of the attribute matches the requirement. Otherwise returns oneflow::Error::CheckFailed().
Multiple In/Output
For some ops, they may have multiple input or output and we need to specify the number of inputs and outputs when we register it.
Input example:
// input must have 1 blob
.Input("input")

// input must have 5 blobs
.Input("input", 5)

// input input must have at least 5  blobs
.InputWithMinimum("input", 5)

// input can have no blob or 1 blob
.OptionalInput("input")

// input can have no blob or 5 blobs
.OptionalInput("input", 5)

// input can have no blob or at least 5 blobs
.OptionalInputWithMininum("input", 5)
Output setting is similar to Input.
SetGetSbpFn
SetGetSbpFn is for config the SBP of this op.
Example of "add_n":
REGISTER_USER_OP("add_n")
    .InputWithMinimum("in", 2)
    .Output("out")
    .SetGetSbpFn([](user_op::SbpContext* ctx) {
      int64_t num_axes = ctx->LogicalTensorDesc4InputArgNameAndIndex("in", 0).shape().NumAxes();
      for (int64_t i = 0; i < num_axes; ++i) {
        ctx->NewBuilder().Split(ctx->inputs(), i).Split(user_op::OpArg("out", 0), i).Build();
      }
      ctx->NewBuilder().PartialSum(ctx->inputs()).PartialSum(user_op::OpArg("out", 0)).Build();
      return Maybe<void>::Ok();
    });
Detailed Introduction of OpKernelRegistry
SetInferTmpSizeFn
In some kernel implementations of op, some extra buffer may be required to store temporary data during the Compute.
We can specify the buffer size when registering the kernel by using the SetInferTmpSizeFn. Then we get the buffer and use it in the Compute function.
The following code registers the kernel with SetInferTmpSizeFn to specify a buffer size as 1024 bytes:
REGISTER_USER_KERNEL("XOp")
    .SetInferTmpSizeFn(
      [](const oneflow::user_op::InferContext*) {
         return 1024;
      });
Once the buffer size is set by SetInferTmpSizeFn, this buffer can be retrieved in Compute by calling the KernelContext::Tensor4ArgNameAndIndex. This buffer is encapsulated as oneflow::user_op::Tensor which can be converted to other types of pointers by calling the dptr or mut_dptr.
class XKernel final : public oneflow::user_op::OpKernel {
  void Compute(oneflow::user_op::KernelContext* ctx) override {
    oneflow::user_op::Tensor* tmp = ctx->Tensor4ArgNameAndIndex("tmp_buffer", 0);

    //The conversion yields a char* buffer of 1024 bytes.
    char* pBuff = tmp->mut_dptr<char>();

    ...
  }
};
Detailed Introduction of OpGradRegistry
Oneflow is automatically get gradient during backward map expansion and the OneFlow framework uses Automatic Differentiation to get the gradient which means automatically find the gradient of the entire expression using the chain rule.
In order to automatically get gradient a custom op, we need to register it with REGISTER_USER_OP_GRAD. From a mathematical point of view, the registration process is the computation of the backward derivation that we specify for our custom op. From a programming point of view, it is to set up a backward-generating function for a custom op. Within that function, we write code that specifies how the input gradient of that op is to be calculated.
In order to calculate the gradient of a custom op, we need to construct the gradient of the input base on the input and output of the custom op. In most cases, we can represent the process of calculating the gradient of the input through the existing operators and their combination in OneFlow.
The calculation of the input gradient usually consists of the following steps:
-
Use
ctx->DefineOp()andBackwardOpBuilderto represent methods for calculating input gradients. Because input gradient calculations may be combinations of multiple operations. ThereforeDefineOpandBackwardOpBuildermay be used for multiple times. -
After defining the calculation process in the previous step, the required gradient is finally recorded in the output of some operator. We need to call the
ctx->FwOp().InputGradBind()to combine the result of the previous calculation to the input gradient of the custom op.
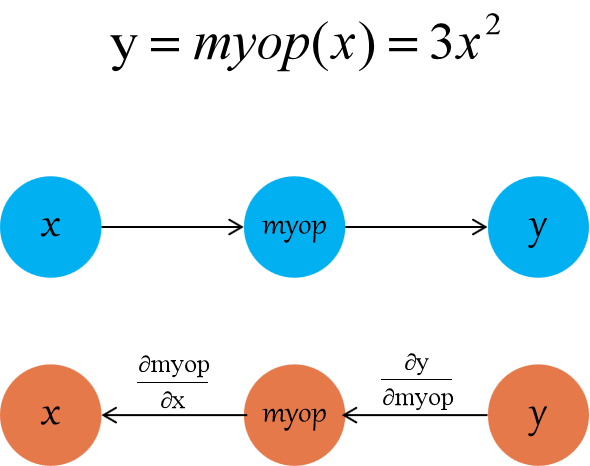
The following example (the complete code, including tests, can be found in myop_grad repository). A custom op called myop will be used to register backward generating functions. This op is only used in this document to show the registration process which compute function is set as 3*x*x.
Then it is easy to obtain the relationship between its forward and backward propagation as shown below. The gradient of x in the reverse process is computed as 6*x*dy.
The forward op of myop is defined as follows:
REGISTER_USER_OP("myop").Input("in").Output("out").SetTensorDescInferFn(
    [](user_op::InferContext *ctx) -> Maybe<void> {
      *ctx->Shape4ArgNameAndIndex("out", 0) =
          *ctx->Shape4ArgNameAndIndex("in", 0);
      *ctx->Dtype4ArgNameAndIndex("out", 0) =
          *ctx->Dtype4ArgNameAndIndex("in", 0);
      return Maybe<void>::Ok();
    });
That is myop contains the only input in and the only output out.
The reverse gradient registration of myop is as follows:
REGISTER_USER_OP_GRAD("myop").SetBackwardOpConfGenFn(
    [](user_op::BackwardOpConfContext* ctx) {

      const auto op1_name = ctx->FwOp().op_name() + "_grad1";

      // The operator op1_name is used to calculate the gradient of myop.in
      ctx->DefineOp(op1_name,
        [&ctx](user_op::BackwardOpBuilder& builder) {
          return builder.OpTypeName("multiply")
              .InputBind("x", ctx->FwOp().input("in", 0)) //multiply.x <- myop.in
              .InputBind("y", ctx->FwOp().output_grad("out", 0)) //multiply.y <-  the gradient of myop.out
              .Output("out")
              .Build();
        });

      const auto op2_name = ctx->FwOp().op_name() + "_grad2";
      // The operator op2_name is used to calculate 6*op1_name.
      ctx->DefineOp(op2_name,
        [&ctx, &op1_name](user_op::BackwardOpBuilder& builder) {
          return builder.OpTypeName("scalar_mul")
              .InputBind("in", ctx->GetOp(op1_name).output("out", 0))
              .Attr("has_float_operand", true)
              .Attr("has_int_operand", false)
              .Attr("float_operand", static_cast<double>(6))
              .Attr("int_operand", static_cast<int64_t>(6))
              .Output("out")
              .Build();
        });

      // (the gradient of myop.in) <- op1_name.out
      ctx->FwOp().InputGradBind(user_op::OpArg("in", 0),
        [&ctx, &op2_name]() -> const std::string& {
          return ctx->GetOp(op2_name)
                .output("out", 0);
        });
  });
The string parameter accepted by REGISTER_USER_OP_GRAD("myop") is op_type_name which needs to be the same as registered with REGISTER_USER_OP.
REGISTER_USER_OP_GRAD("myop") returns an oneflow::user_op::OpGradRegistry object that we can call it to set the custom op's backward generating function.
In the above gradient registration process, the expression for the gradient of myop is 6*x*dy which is demonstrated in the code.
First op1_name is defined and x*dy is solved by using the existing operator multiply:
//  The operator op1_name is used to calculate the gradient of myop.in
ctx->DefineOp(op1_name,
  [&ctx](user_op::BackwardOpBuilder& builder) {
    return builder.OpTypeName("multiply")
        .InputBind("x", ctx->FwOp().input("in", 0)) //multiply.x <- myop.in
        .InputBind("y", ctx->FwOp().output_grad("out", 0)) //multiply.y <- myop.out的梯度
        .Output("out")
        .Build();
  });
Then op2_name is defined and use the existing operator op2_name to solve for 6*op1_name.
// The operator op2_name is used to calculate 6*op1_name.
ctx->DefineOp(op2_name,
  [&ctx, &op1_name](user_op::BackwardOpBuilder& builder) {
    return builder.OpTypeName("scalar_mul")
        .InputBind("in", ctx->GetOp(op1_name).output("out", 0))
        .Attr("has_float_operand", true)
        .Attr("has_int_operand", false)
        .Attr("float_operand", static_cast<double>(6))
        .Attr("int_operand", static_cast<int64_t>(6))
        .Output("out")
        .Build();
  });
Finally bind the output of op2_name (i.e., 6*x*dy) to the input of myop to complete the registration.
// (the gradient of myop.in) <- op1_name.out
ctx->FwOp().InputGradBind(user_op::OpArg("in", 0),
  [&ctx, &op2_name]() -> const std::string& {
    return ctx->GetOp(op2_name)
          .output("out", 0);
  });
The above code is the complete process of registering a gradient and the related classes and methods will be described in below.
SetBackwardOpConfGenFn
We use OpGradRegistry::SetBackwardOpConfGenFn(fn) to set the backward generating function fn which has the following prototype:
void fn(BackwardOpConfContext* ctx);
BackwardOpConfContext* ctx has all information needed to generate the op.
BackwardOpConfContext
The common methods and their purpose used in BackwardOpConfContext as follows:
-
UserOpWrapper& FwOp();: Get forward op. -
GetOp(op_name): Create and get the correspondingopbased onop_name.GetOpuses a lazy init mechanism and the corresponding op is not actually created untilGetOpis called. -
void DefineOp(op_name, fn):Definefnof the op namedop_name. Whenctx->GetOp(op_name)is called,fnis triggered in the OneFlow for Op creation and if the op has already been created. Then the result is retrieved directly. Thefnreceives aBackwardOpBuilderparameter for constructing the reverse op. We will introduceBackwardOpBuilderlater on.
Detailed Introduction of BackwardOpBuilder
BackwardOpBuilder is used to build a reverse op. The fragment of above code is an example:
ctx->DefineOp(op1_name,
  [&ctx](user_op::BackwardOpBuilder& builder) {
    return builder.OpTypeName("multiply")
        .InputBind("x", ctx->FwOp().input("in", 0)) //multiply.x <- myop.in
        .InputBind("y", ctx->FwOp().output_grad("out", 0)) //multiply.y <- myop.out的梯度
        .Output("out")
        .Build();
  });
In this function, we call Build to build a reverse op for computing x*dy.
The purpose of each operator is as follows:
-
OpTypeName("multiply")specifies theop_type_nameof an op that is used to help us compute the reverse gradient. -
InputBind(arg_name, blob)binds the inputarg_nameofmultiplyto the specifiedbloband can be called for multiple times. If thearg_namecorresponds to multiple blob which means the order ofInputis the order of the corresponding index. -
Output(arg_name, num)Specifies the number of output blobes that actually correspond to thearg_namewhich defaults to 1 ifnumis not filled in. -
Attr(attr_name, val)sets the value of the attribute which same in the registration. -
Calling
Build()after above configuration, then the construction of the reverse op is completed.
Detailed Introduction of UserOpWrapper
Calling ctx->FwOp() will return the UserOpWrapperof myop and complete the gradient binding by calling the UserOpWrapper.
ctx->FwOp().InputGradBind(user_op::OpArg("in", 0),
  [&ctx, &op2_name]() -> const std::string& {
    return ctx->GetOp(op2_name)
          .output("out", 0);
  });
Common methods for UserOpWrapper are:
-
InputGradBind(input, grad_fn):Bind the input of the forward op and get the gradient functiongrad_fn. OneFlow automatically determines whether input needs to generate a backward gradient, if needed, it will triggergrad_fnand binds the input. -
input(arg_name, index):Get the blob corresponding to thearg_nameof input. -
output(arg_name,index):Get the blob corresponding to thearg_nameof output. -
output_grad(output_arg_name, index):Get theoutput_arg_nameof the forward op which is the blob of the corresponding backward gradient. -
attr(attr_name):Get the value corresponding to theattr_name. -
arg_tensor_desc(arg_name, index):Returns the input/output tensor information of the forward op which includingshape,dtypeand etc.
Customized Op for Calculating Gradients
As we mentioned earlier, in most cases, the process of calculating a gradient can be represented by a combination of existing ops. However, when it is difficult to use an existing op to solve the gradient for a particular forward op that we need to design and create operators specifically for the gradient calculation. Example can be found in: relu_op.cpp.
Detailed Introduction of UserOpConfBuilder
In Python frontend of OneFlow, we provide UserOpConfBuilder to build the wrapper of custom op which is used in Use custom opp in Python previously. Here is the summary of the relationship between UserOpConfBuilder in Python layer and C++ layer.
For example, we have wrapped a cast:
def cast(x, dtype, name):
    return (
        flow.user_op_builder(name)
        .Op("cast")
        .Input("in", [x])
        .Output("out")
        .Attr("dtype", dtype)
        .Build()
        .InferAndTryRun()
        .RemoteBlobList()[0]
    )
)
-
Op(op_type_name):The accepted parameter isop_type_namewhen it is registered in C++. -
Input(input_name, input_blob_list):input_nameshould be the same as the first parameter ofInputwhen registering this op in C++. -
Output(output_name, num=1):output_nameandnumshould be the same asOutputof op when registration in C++. -
Attr(attr_name, attr_value):attr_namecorresponds to the attribute ofOpRegistry::Attrused for C++ registration andattr_valueshould be the same type as the attribute type when declaration. -
Build():Build the user op for the Python layer.
The derivation can be done by calling InferAndTryRun in the user op and the result can be retrieved by calling RemoteBlobList or SoleOutputBlob.
-
RemoteBlobList:Get all outputs which applies to op with multiple outputs and all ops are placed in a list. -
SoleOutputBlob:Get unique outputs which applies to op with one output.