Resnet
Introduction
Image classification and CNN
Image classification is an image processing method that divided different features reflected in image information into different categories of targets. It is the basis of other tasks in computer vision, such as detection, semantic segmentation, face recognition and other high-level visual tasks.
ImageNet Large-scale Visual Recognition Challenge (ILSVRC), often called ImageNet copetition, including image classification, object orientation, object detection and other tasks. It is one of the most important competition to promote the development of computer vision.
In the 2012 ImageNet competition, deep convolution network Alexnet was born. With a top-5 accuracy rate more than 10% higher than the second place, it won the champion of 2012 ImageNet competition. Since then, the deep learning method represented by CNN(Convolutional neural network) has been applied in the field of computer vision. More and deeper CNN networks have been proposed, such as VGGNet, the champion of 2014 ImageNet competition, ResNet, the champion of 2015 ImageNet competition.
ResNet
ResNet is the champion of 2015 competition. At present, compared with traditional machine learning classification algorithm, ResNet has achieved excellent results. After that, a large number of detection, segmentation, classification and other tasks are completed on the base of ResNet.
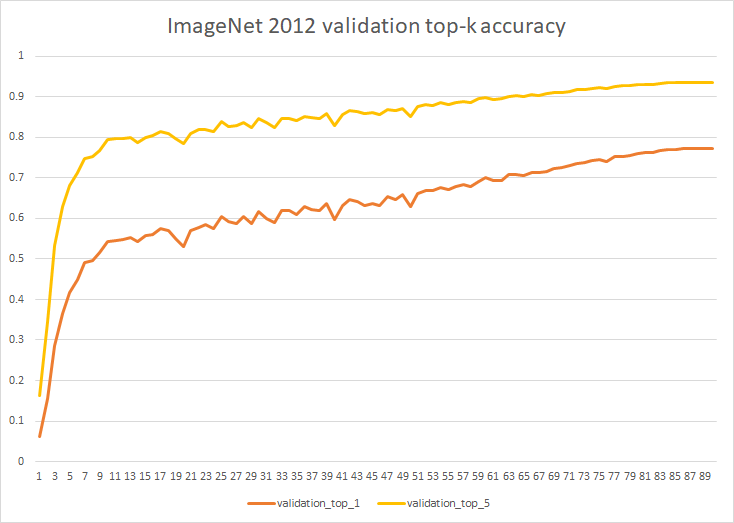
In OneFlow-Benchmark repository, we provide OneFlow implementation of ResNet50 v1.5. After 90 epochs of training on ImageNet-2012 dataset, the accuracy of evaluation can reach 77.318% (Top 1), 93.622% (Top 5).
For more detailed network parameter alignment, you can refer to OneFlow-Benchmark's cnns part.
Some notes on ResNet50 v1.5
ResNet50 v1.5 is an improved version of the original ResNet50 v1, compared with the original model, the accuracy improve slightly Top1(~0.5%), you can refer to there for more details.
Next, we take the above ResNet50 network as an example to show how to use OneFlow to train and predict step by step.
The main contents include:
- Preparation
-
The installation and preparation of project
-
Quick start
- Predict / Inference
- Train / Predict
- Evaluation
- More details
- Distributed training
- Hybrid precision training and prediction
- Advanced
- Parameter alignment
- Preparing dataset (ImageNet 2012)
- Convert OneFlow model to ONNX model
Requirements
Don't worry, it is easy to use OneFlow. You can start OneFlow's image recognition journey with three steps as follow.
Install OneFlow,you can refer to OneFlow project home page to finish installation.
Clone / Download OneFlow-Benchmark repository.
git clone git@github.com:Oneflow-Inc/OneFlow-Benchmark.git
cd OneFlow-Benchmark/Classification/cnns
Preparing Dataset (optional)
Use synthetic virtual dataset directly.
- Download the ImageNet 2012 mini-dataset we created and unzip it into the data directory
- Or: Make a complete OFRecord format ImageNet dataset (see the advanced section below)
We provide general scripts:
train.shandinference.sh, which are applicable to the training, validation and inference of all cnn networks in this repository. You can train different models and dataset by setting parameters in scripts.Some notes on model
By default, we use ResNet50, you can also assign other model by setting the
--modelparameter. Such as:--model="resnet50",--model="vgg"and so on.Description of dataset
1) To get reader quickly start, we provide synthetic virtual dataset, which refers to data is generated directly in memory as a random source of neural network.
2) At the same time, we provide a mini-dataset. You can download and unzip it into data directory, you can start training quickly. After getting familiar with the process, readers can refer to the making dataset part to make a complete ImageNet 2012 dataset.
3) Using OFRecord dataset can improve the efficientcy of data loading (But this is not necessary, refer to Data Input, OneFlow supports loading numpy data directly).
Quick Start
So, let's start OneFlow's image classification journey !
First, switch to the directory:
cd OneFlow-Benchmark/Classification/cnns
Pretrained Model
resnet50
resnet50_v1.5_model (validation accuracy: 77.318% top1,93.622% top5 )
Predict / Inference
After downloading pretrained model, unzip it and put it into the current directory. Then execute:
sh inference.sh
This script will call the model to classify the goldfish picture:
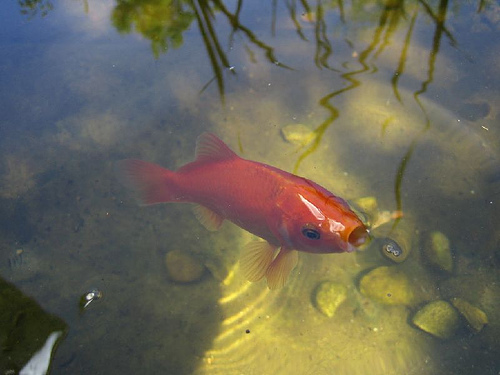
The prediction is successful if the following is output.
data/fish.jpg
0.87059885 goldfish, Carassius auratus
As you can see, model judge this picture with 87.05% probability is goldfish.
Train & Validation
- Training model is also easy as we just need to execute:
sh train.sh
You can start training model and you will see the follow output
Loading synthetic data.
Loading synthetic data.
Saving model to ./output/snapshots/model_save-20200723124215/snapshot_initial_model.
Init model on demand.
train: epoch 0, iter 10, loss: 7.197278, top_1: 0.000000, top_k: 0.000000, samples/s: 61.569
train: epoch 0, iter 20, loss: 6.177684, top_1: 0.000000, top_k: 0.000000, samples/s: 122.555
Saving model to ./output/snapshots/model_save-20200723124215/snapshot_epoch_0.
train: epoch 0, iter 30, loss: 3.988656, top_1: 0.525000, top_k: 0.812500, samples/s: 120.337
train: epoch 1, iter 10, loss: 1.185733, top_1: 1.000000, top_k: 1.000000, samples/s: 80.705
train: epoch 1, iter 20, loss: 1.042017, top_1: 1.000000, top_k: 1.000000, samples/s: 118.478
Saving model to ./output/snapshots/model_save-20200723124215/snapshot_epoch_1.
...
To facilitate running the demonstration, we use synthetic virtual dataset by default so that you can quickly see the model in action.
Also, you can use mini-dataset, after downloading it and unzip it in data directory, and then modify the training script as follows:
rm -rf core.*
rm -rf ./output/snapshots/*

DATA_ROOT=data/imagenet/ofrecord

python3 of_cnn_train_val.py \
    --train_data_dir=$DATA_ROOT/train \
    --num_examples=50 \
    --train_data_part_num=1 \
    --val_data_dir=$DATA_ROOT/validation \
    --num_val_examples=50 \
    --val_data_part_num=1 \
    --num_nodes=1 \
    --gpu_num_per_node=1 \
    --model_update="momentum" \
    --learning_rate=0.001 \
    --loss_print_every_n_iter=1 \
    --batch_size_per_device=16 \
    --val_batch_size_per_device=10 \
    --num_epoch=10 \
    --model="resnet50"
Running this script, we will train a classfication model on the mini-ImageNet dataset with only 50 goldfish images. We can use this model to classify the goldfish image.
Don't worry, if you need to train model on the complete ImageNet2012 dataset, please refer to OneFlow-Benchmark repository.
Evaluate
You can evaluate the accuracy of the Resnet50 model using either your own trained model or the resnet50_v1.5_model (unzip it and put it in current directory) provided by us.
Run this script:
sh evaluate.sh
The accuracy of the trained model on validation dataset with 50000 images can be obtained:
Time stamp: 2020-07-27-09:28:28
Restoring model from resnet_v15_of_best_model_val_top1_77318.
I0727 09:28:28.773988162    8411 ev_epoll_linux.c:82]        Use of signals is disabled. Epoll engine will not be used
Loading data from /dataset/ImageNet/ofrecord/validation
validation: epoch 0, iter 195, top_1: 0.773277, top_k: 0.936058, samples/s: 1578.325
validation: epoch 0, iter 195, top_1: 0.773237, top_k: 0.936078, samples/s: 1692.303
validation: epoch 0, iter 195, top_1: 0.773297, top_k: 0.936018, samples/s: 1686.896
Before executing
sh evaluate.sh, make sure you have prepared the validation dataset of ImageNet 2012. Please refer to OneFlow-Benchmark repository to learn how to make validation dataset.
From the evaluation results of the three rounds, out model has achieved 77.32+% Top1 accuracy.
Finally, congratulations! You complete the training / validating, inference and evaluation of ResNet model on ImageNet dataset. Applause for yourself!
Details
Distributed training
Simple and easy-to-use distributed training is one of OneFlow's main features
OneFlow is designed to support efficient distributed training natively. Especially for distributed data parallelism, user do not have to worry about how to divide and synchronize the data when the algorithm expands from single machine to multiple machines. That is to say, in OneFlow, User only need to write algorithm from the view of single machine, and the code automatically has the ability of distributed training.
How to configure and run distributed training?
We still use the code shown in the "Quick Start", in train.sh, the distributed configuration is easily accomplished by specifying the number of nodes (machines) with --num_nodes, the IP address of the nodes with --node_ips, and the number of devices to be used on each node with --gpu_num_per_node.
For example, we want to do distributed training on 2 machines with 8 devices, configure it like this:
# train.sh
python3 of_cnn_train_val.py \
    --num_nodes=2 \
    --node_ips="192.168.1.1, 192.168.1.2"
    --gpu_num_per_node=4 \
    ...
    --model="resnet50"
Then execute the following script on the two machines at the same time:
./train.sh
After the program starts, you can see through the command watch -n 0.1 nvidia-smi that both machines' devices start working. After a while, the output is printed on the screen of the first machine set by --node_ips.
Hybrid precision training and predicting
Currently, OneFlow supports float16/float32 hybrid precision training. During training, the model parameters are trained using float16 while retaining float32 as the gradient update and calculation process. Since the storage of parameters is halved, the training speed will be improved.
By turning on the hybrid precision training mode in OneFlow, ResNet50's training speed can theoretically reach 1.7 times of acceleration.
How to turn on the hybrid precision training mode?
Just add the parameter --use_fp16=True in the train.sh script.
Hybrid precision model
We provide a hybrid precision model after training 90 epochs on ImageNet2012 dataset, its Top_1 accuracy: 77.33%.
You can download and use it directly: resnet50_v15_fp16
Advanced
Parameters alignment
OneFlow's ResNet50 implementation is aligned with Nvidia's Mxnet edition. We've made careful and almost identical alignment from the learning rate, optimizer, image augmentation to finer per-layer network configuration, bias, weight initialization, and more. The detailed parameters alignment please refer to OneFlow-Benchmark repository.
Preparing dataset
Introduction of image classification dataset
The public dataset used for image classification are CIFAR, ImageNet, etc. These datasets provide original images in JPEG format.
Hinton's student Alex Krizhevsky and Ilya Sutskever collated a small dataset to classify pervasive objects. It includes CIFAR-10 and CIFAR-100
ImageNet dataset are generally referred to as the dataset used in large-scale visual recognition challenge (ILSVRC) between 2010-2017. The ImageNet data has changed slightly since 2010. The commonly used ImageNet-2012 dataset includes 1000 categories, its training dataset contains 1281167 pictures, ranging from 732 to 1300 per category. The validation dataset contains 50000 pictures, with an average of 50 pictures per category.
For the complete process of preparing ImageNet-2012 dataset, please refer to README in the tools directory.
Convert OneFlow model to ONNX model
Introduction
ONNX (Open Neural Network Exchange) is a widely used neural network intermediate format. With the ONNX format, the OneFlow model can be used by many serving framework (like OpenVINO, ONNEX Runtime and some mobile framework: ncnn, tnn, TEgine, etc). In this section, we will introduce how to convert the trained ResNet50 v1.5 model to ONNX model and evaluate it.
Quick Start
We provide complete code: resnet_to_onnx.py, it can help you complete the transformation and testing of the model.
**Step1: ** Download the pretrain model: resnet50_v1.5_model, unzip it and put it into current directory
**Step2: ** Execute python3 resnet_to_onnx.py
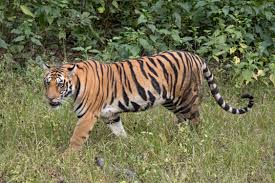
This code will complete the transformation of the OneFlow model -> ONNX model, and then use the ONNX Runtime to load the transformed model to test the individual images. The test picture is as follows:
Output:
Convert to onnx success! >>  onnx/model/resnet_v15_of_best_model_val_top1_77318.onnx
data/tiger.jpg
Are the results equal? Yes
Class: tiger, Panthera tigris; score: 0.8112028241157532
How to generate ONNX model
We have introduced how to convert OneFlow's ResNet model to ONNX model and give an example of using the onnx runtime to make predictions in above example. Similarly, you can follow the steps to complete the transformation of your training ResNet model or other models.
Step1: Save the model's weight
First you should specify the OneFlow model path, and then specify the transformed ONNX model storage path, like the following example.
首先指定待转换的OneFlow模型路径,然后指定转换后的ONNX模型存放路径,例如示例中:
#set up your model path
flow_weights_path = 'resnet_v15_of_best_model_val_top1_77318'
onnx_model_dir = 'onnx/model'
Step2: Create a new job function for inference
Then, we create a new job function for inference, which only contains the network structure, except the operator to read the OFRecord, and accepts the form of numpy array input. You can refer to the InferenceNet in resnet_to_onnx.py.
Step3: Call flow.onnx.export method
In the following code, we call the oneflow_to_onnx() method, this method includes the core model transformation method: flow.onnx.export().
flow.onnx.export will obtain ONNX model from OneFlow network, its first parameter is the job function used to infer. The second parameter is OneFlow model path, the third parameter is the save path of ONNX model.
onnx_model = oneflow_to_onnx(InferenceNet, flow_weights_path, onnx_model_dir, external_data=False)
Evaluate the correctness of ONNX model
After the ONNX model is generated, we can use ONNX model by ONNX Runtime to verify that the OneFlow model and the ONNX model give the same results with the same inputs. The corresponding code is check_equality in resnet_to_onnx.py.